


You recorded a Zoom meeting. Now you need the transcript.
Maybe it was a client call, research interview, webinar, class, or internal meeting.
A transcript lets you search within the conversation, pull quotes, create follow-ups, and turn the recording into usable text.
There are two key ways to transcribe Zoom recordings to text:
- Use Zoom’s native transcript feature for cloud recordings, or
- Upload the recording to an audio-to-text tool like HappyScribe for a cleaner and more flexible transcription workflow
Let me show you how both methods work.
Method 1: Use Zoom’s native transcript feature for cloud recordings
Zoom can create audio transcripts for cloud recordings. It works when the meeting or webinar was recorded in the Zoom cloud and audio transcription was enabled.
After Zoom processes the recording, the transcript appears as a separate VTT file in the list of recorded meetings. You can also view the transcript beside the recording and edit phrases in the Zoom web portal.
It’s the simplest option if your recording is already in Zoom and you only need a basic transcript file.
Requirements for Zoom cloud recording transcripts
Zoom’s native audio transcription workflow is tied to cloud recordings. To use it, Zoom lists these requirements:
- A Pro, Business, Education, or Enterprise account
- Cloud recording enabled
- Audio transcription enabled
Zoom offers two types of recordings: computer and cloud.
Computer recordings, available with all Zoom accounts, are saved directly to your computer.
Cloud recordings, available with paid accounts, are stored on the Zoom Cloud, allowing them to be viewed, shared, and downloaded.
Both options provide standard MP4 video, M4A audio, and chat text files. Cloud recording is available to paid Zoom Pro, Business, Education, and Enterprise plan subscribers.
This means Zoom’s native transcript workflow may not be available if you are on a free plan, if your admin has disabled cloud recording, or if the recording was saved locally to your computer.
How to transcribe a Zoom cloud recording?
- Sign in to the Zoom web portal.
- In the navigation menu, click Settings, then the Recording tab.
- Locate the Cloud recording setting and verify that it is enabled.
- Under Advanced cloud recording settings, select the Create audio transcript checkbox, then click Save.
- Start or join a Zoom meeting as the host.
- Click Record.
- Choose Record to the Cloud.
- End the meeting and wait for Zoom to process the recording.
- Open the recording from the Zoom web portal.
- View, edit, or download the transcript.
💡 Note:
If the Cloud recording toggle is grayed out, it has been locked at either the account or group level, and you will need to contact your Zoom administrator. Admins enabling this across an account or group will find the same checkbox under the Recording & Transcript tab.
The audio transcript takes additional time to process after the cloud recording becomes available.
How to download a Zoom transcript?
Once the transcript is ready, you can download it from the cloud recording page.
Sign in to the Zoom web portal, click Recordings & Transcripts, and open the Cloud recordings tab. Open the recording and download the audio transcript file.
Audio transcripts are saved in VTT format. If you download the VTT file, you can open it with a text editor or word processing application. You can also view or edit transcripts in the web portal.
VTT is useful for captions and timestamped playback. But it is not always the cleanest format for sharing, editing, or turning into a readable document.
If you need a Word document, PDF, subtitle file, or polished transcript, you may need a dedicated AI transcription tool.
Limitations of Zoom’s native transcription
Zoom’s built-in transcript feature can work well when your recording is already saved to the cloud. But it has a few practical limits.
1. It applies to cloud recordings
Zoom’s audio transcription setting applies to cloud recordings, not computer recordings saved to your device.
That is important if you have a local Zoom recording. Zoom computer recording saves files directly to your device and is available to both free and paid subscribers, but it does not follow the same cloud transcript workflow.
If your recording is already saved as an MP4 or M4A file on your computer, uploading it to HappyScribe’s video-to-text converter is the easier route.
2. It may require a paid Zoom setup
Zoom cloud recording has plan requirements. The audio transcript feature also depends on cloud recording and audio transcription being enabled.
If you do not see the transcript option, your plan, admin settings, or recording type may be the reason.
3. It supports a limited set of languages
By default, audio transcripts for cloud recordings on Zoom are generated in English, but you can choose the default language for a recording and regenerate the transcript.
To change it, hover over the Audio transcript file in the Cloud recordings tab, click Change Language, select from the available languages, and click Save.
Zoom will reanalyze and transcribe the audio in the newly selected language.
Zoom currently supports 19 languages: English, Spanish, French, German, Italian, Chinese (Simplified), Russian, Ukrainian, Japanese, Korean, Vietnamese, Dutch, Portuguese, Arabic, Polish, Romanian, Swedish, Turkish, and Danish.
If you work with a multilingual team and need support beyond these 19 languages, look for a multilingual transcription software.
4. Captions and transcripts changed in May 2026
Starting May 18, 2026, users can no longer save or download closed captions. Captions remain available during meetings, with up to 3 minutes of scroll back, and during recording playback in the Zoom Workplace app or web portal.
Zoom now has a separate Meeting transcript setting, found under Settings, the Meeting tab, and In Meeting (Advanced).
Transcripts are the saved record of meeting content, and they are not enabled by default: a host or admin must explicitly turn them on. It requires a Pro, Business, or Enterprise account.
This is separate from the cloud recording audio transcript I covered above. If your team relied on saved captions, that route is closed.
5. It gives you a VTT file
A VTT file is useful when you want captions or timestamped playback. But it is less ideal when you want a clean transcript for a client recap, research document, article, training resource, or internal knowledge base.
You may need to remove timestamps, clean formatting, fix punctuation, correct speaker labels, and convert the transcript into another format.
Method 2: Transcribe Zoom recordings with HappyScribe
HappyScribe is the ideal option when you already have a Zoom recording and want to turn it into clean, editable text.
You can upload a recorded Zoom file, choose AI or human transcription, review the transcript in the browser, and export it in the format you need.
HappyScribe’s video-to-text tool supports imports from your computer, Zoom, Google Drive, Dropbox, YouTube, and other sources. It also supports formats like MP4, MOV, AVI, MKV, M4V, and WebM.
This makes HappyScribe a better fit for recorded Zoom meetings, webinars, interviews, lectures, customer calls, and training sessions.
Why use HappyScribe for Zoom recordings?
Zoom’s native transcript feature works when your recording was saved to the cloud and transcript settings were turned on.
HappyScribe gives you more flexibility. You can use it when:
- You have a local Zoom recording
- You downloaded a Zoom cloud recording
- Someone sent you a Zoom recording file
- You need a clean transcript instead of a VTT file
- You need DOCX, PDF, TXT, SRT, or VTT exports
- You need subtitles from the same recording
- You need transcription in 150+ languages
- You want to search and reuse transcripts later
HappyScribe supports video transcription in more than 150 languages and accents. It also lets users choose AI transcription for speed or human-made professional transcripts for recordings that need higher accuracy.
Follow these steps to transcribe your Zoom recordings using HappyScribe:
Step 1: Download your Zoom recording
Start by finding your Zoom recording.
If it was a cloud recording, sign in to the Zoom web portal and open your cloud recordings. Download the video or audio file.
If it was a local recording, find the saved folder on your computer.
Your computer recordings are stored on your computer hard disk. By default, they are in your Documents folder in a file named zoom. If you changed the storage location in your Zoom desktop app, check that folder instead. Computer recordings are also accessible from Zoom Hub.
For transcription, you can usually upload either the video file or the audio file. Clear audio will do more for transcript quality than high video resolution.
Step 2: Upload the Zoom recording to HappyScribe
Next, upload the Zoom recording to HappyScribe.
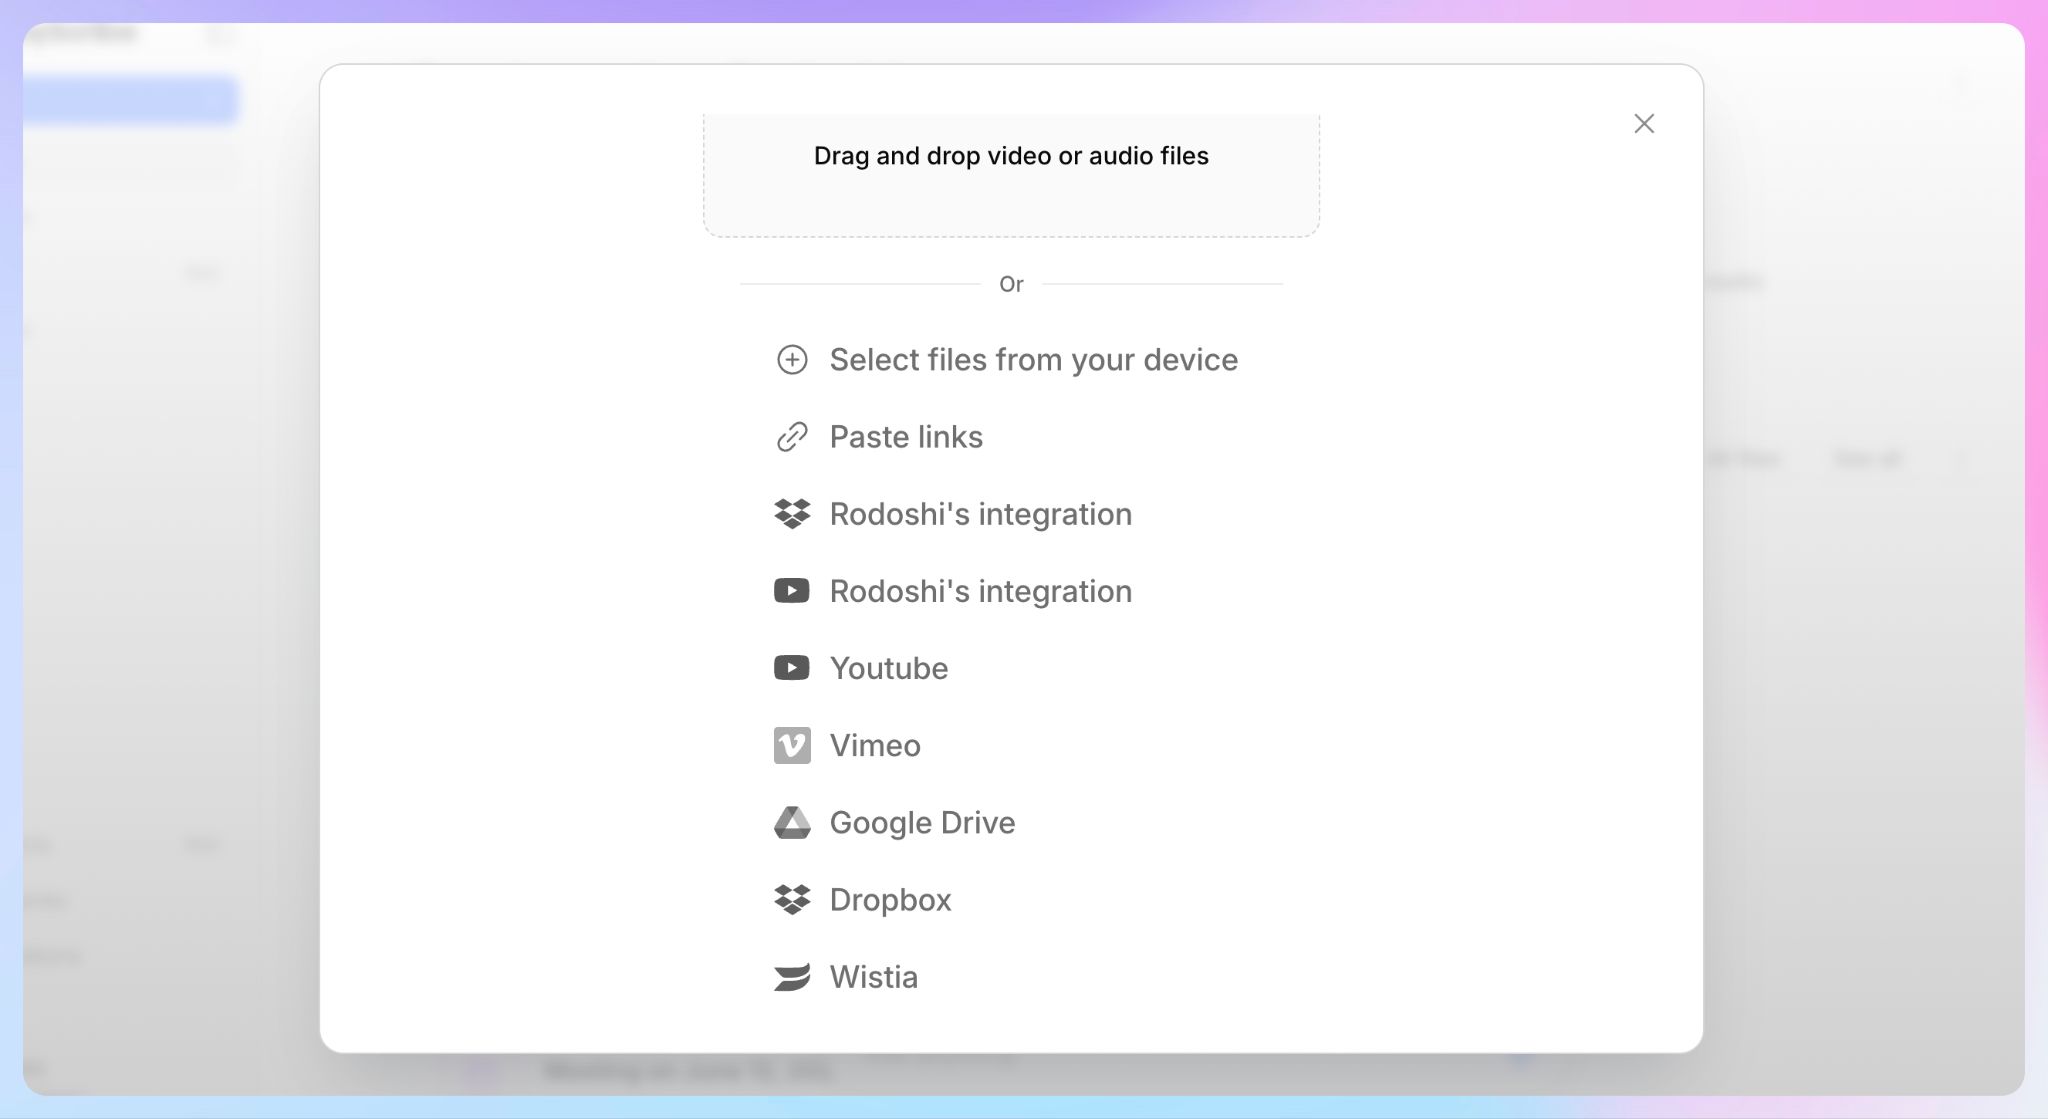
You can import a file from your computer or bring it in from tools like Zoom, Google Drive, Dropbox, and YouTube. HappyScribe supports common video formats including MP4, MOV, AVI, MKV, and more.
This helps when your Zoom recordings are spread across different places. You might have some files saved locally, some in Zoom cloud, and others in Drive or Dropbox. HappyScribe gives you one workspace to transcribe and organize them.
Step 3: Choose AI or human transcription
After uploading the file, choose how you want the recording transcribed.
Use AI transcription when you need a fast transcript for internal meetings, webinars, team updates, or general review.
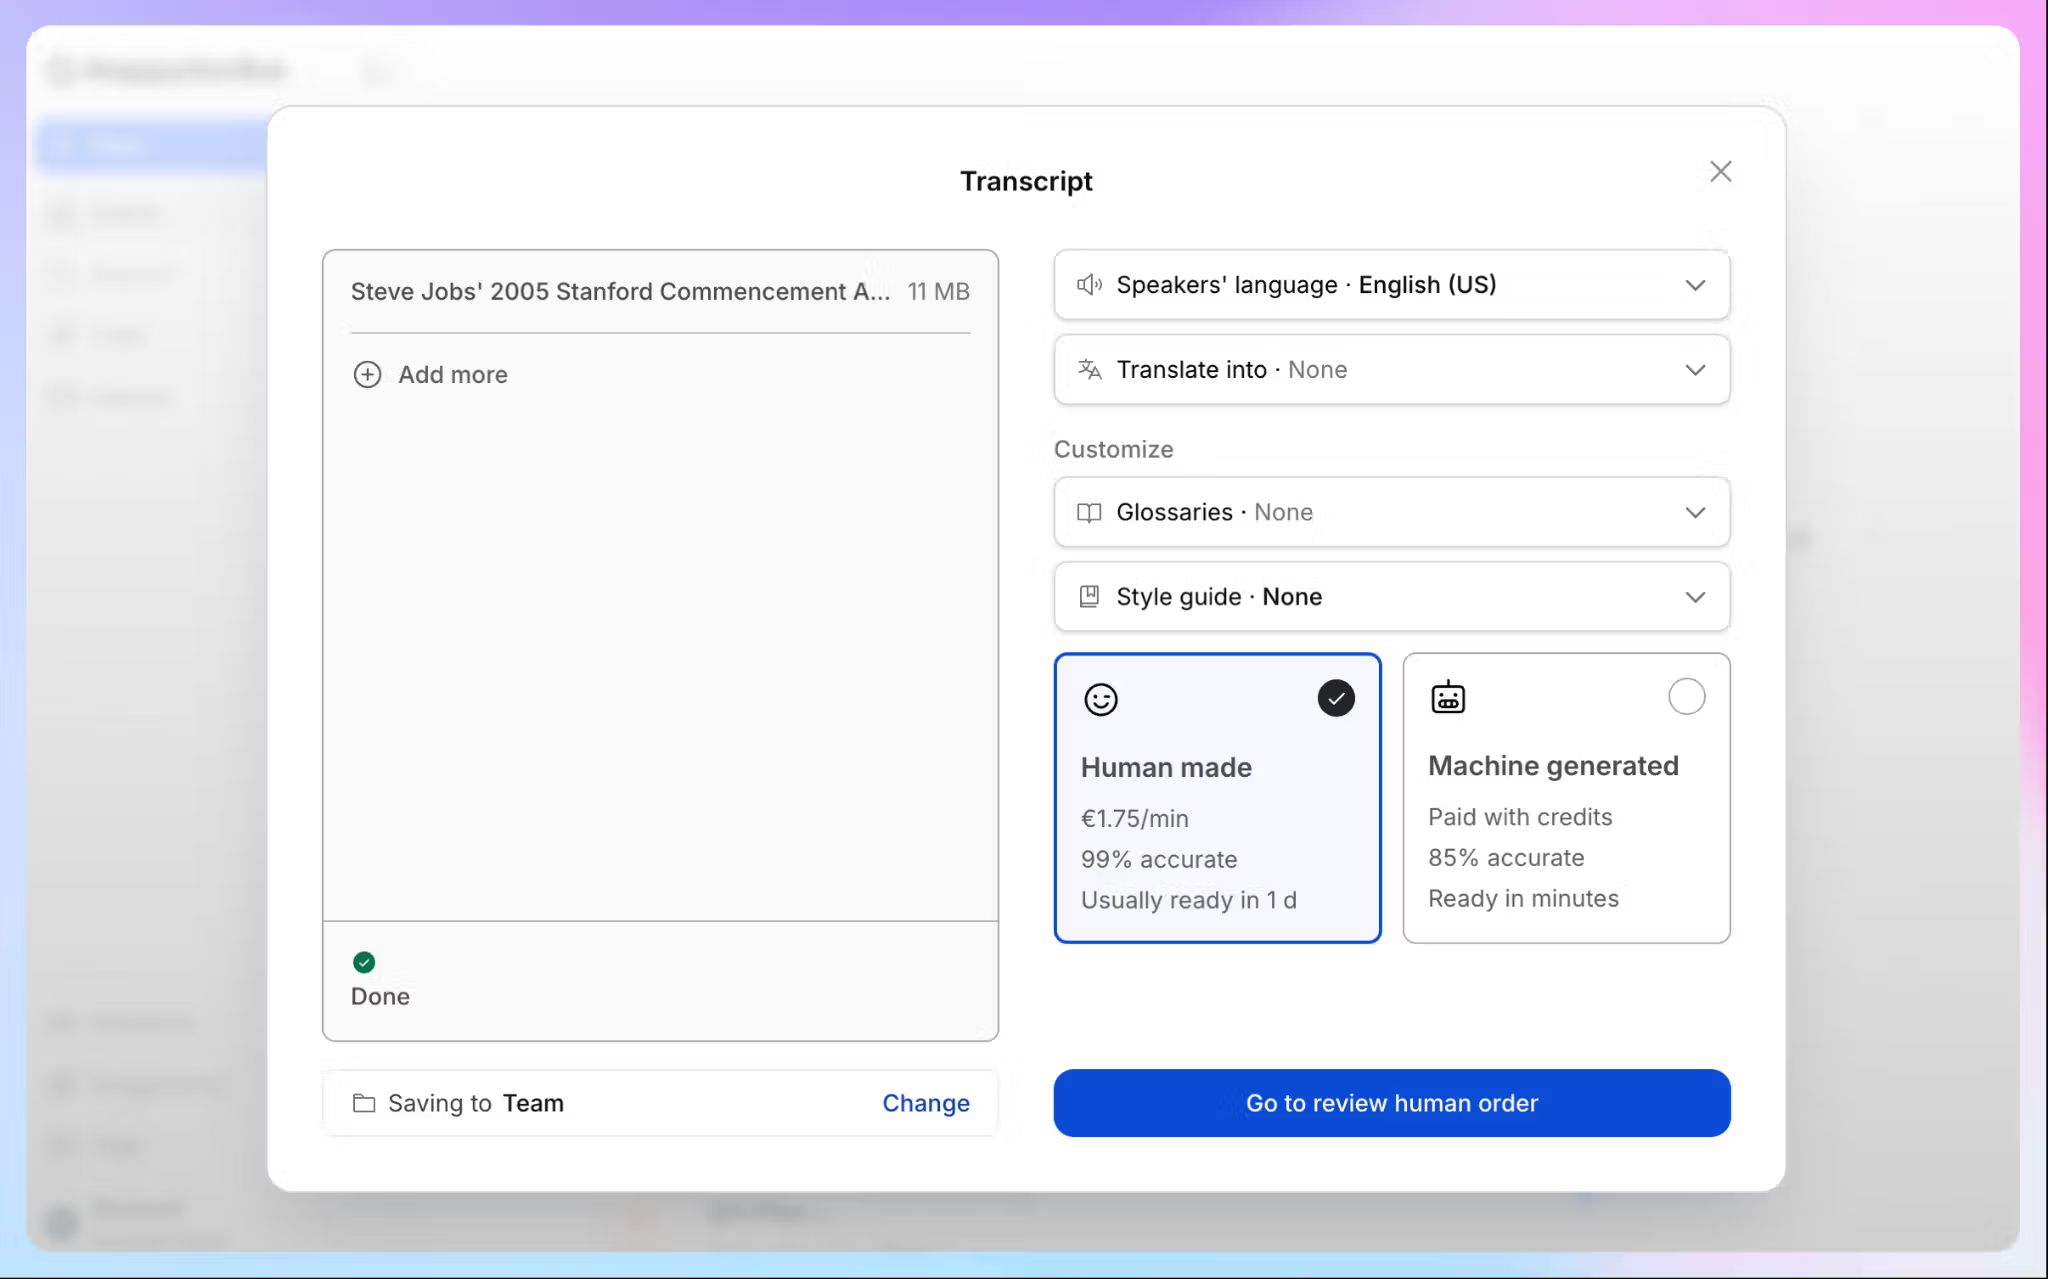
Use human transcription when accuracy is the priority. HappyScribe offers human-made transcripts for interviews, research, legal recordings, and other recordings where the transcript needs extra review.
It gives you more control than a single native Zoom transcript. You can use AI for everyday recordings and human review for high-stakes files.
Step 4: Edit the transcript in the browser
Once the transcript is ready, review it in HappyScribe’s editor.
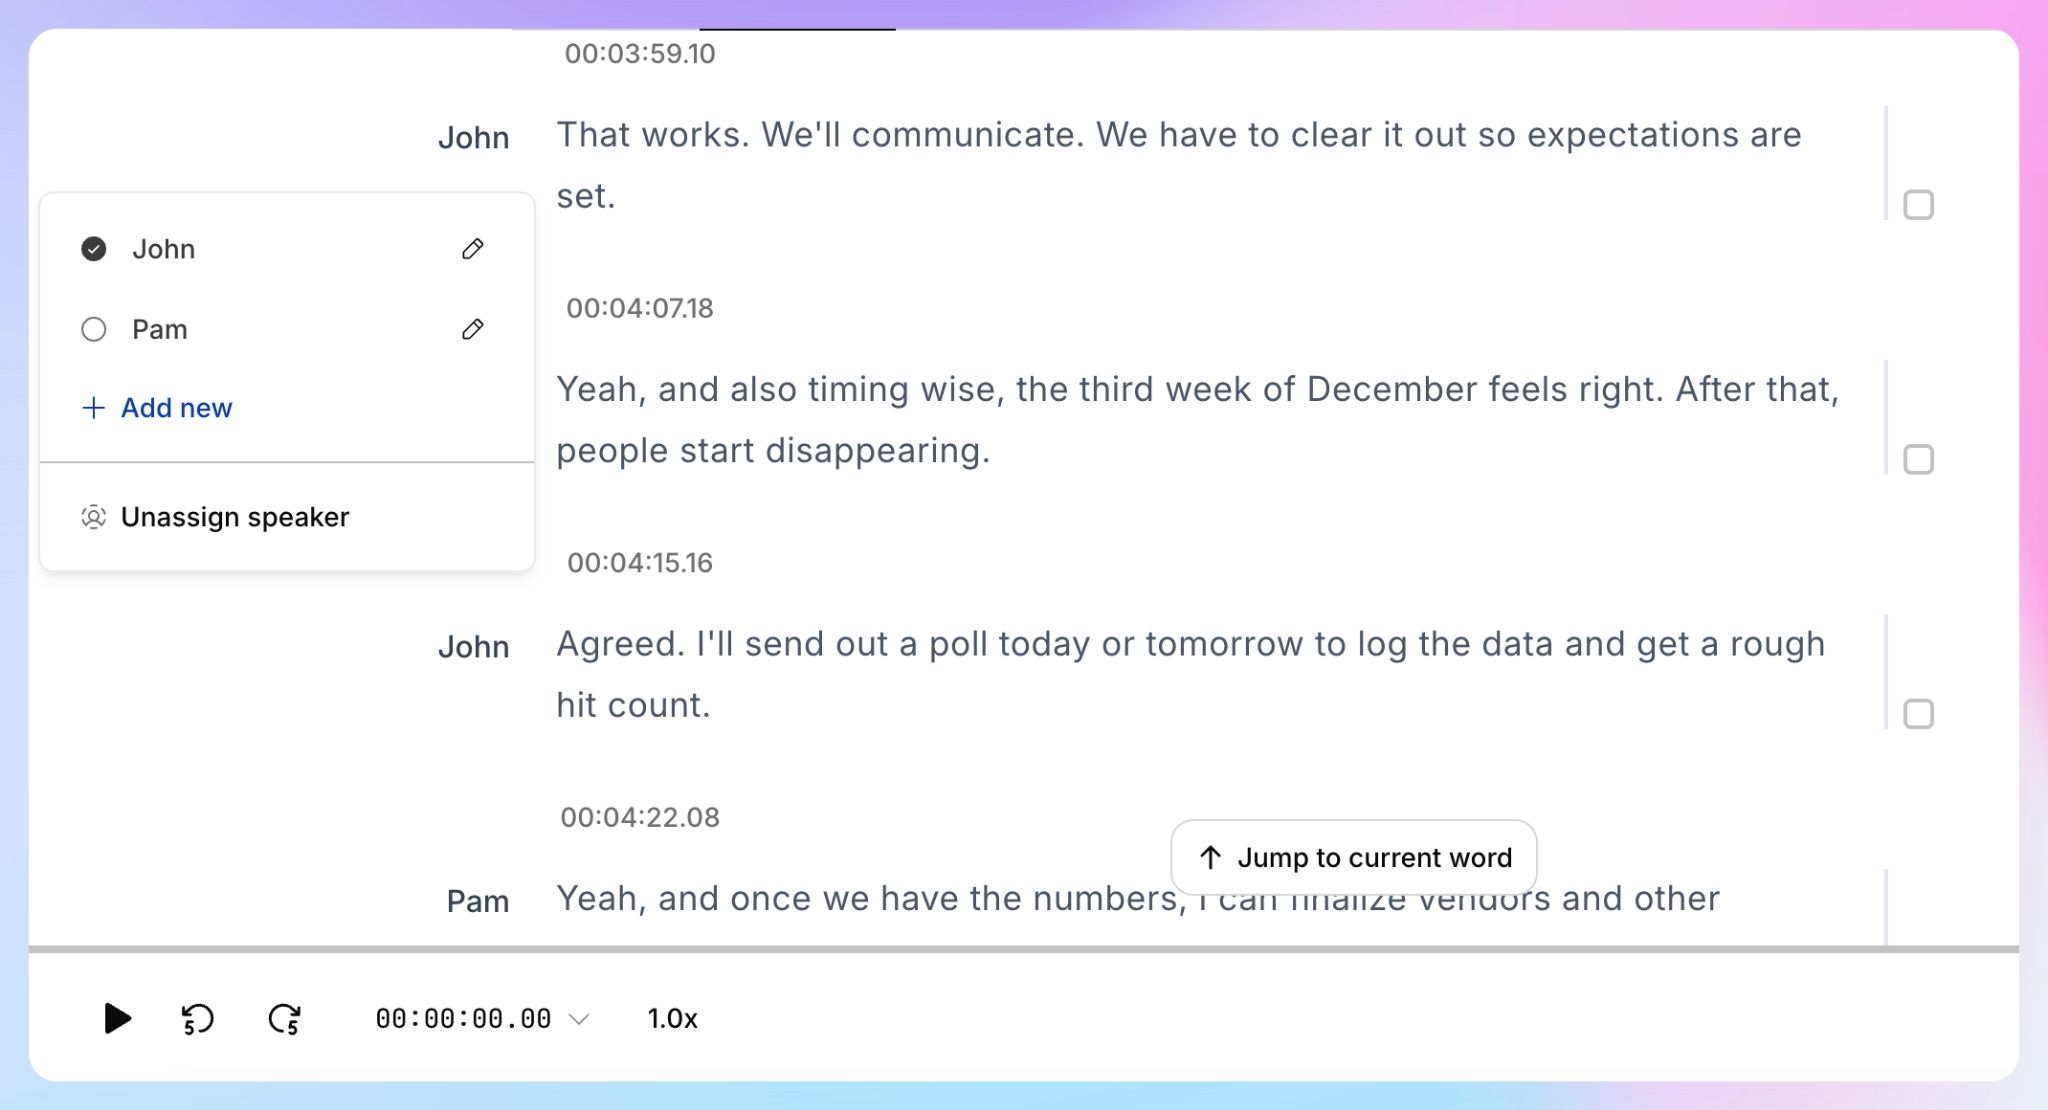
You can correct names, fix technical terms, adjust timestamps, and label speakers using HappyScribe’s online editor.
A clean transcript is easier to share. It is also easier to reuse for content, research, documentation, subtitles, or internal notes.
Step 5: Export the transcript
After editing, export the transcript in the format you need.
HappyScribe supports exports in TXT, DOCX, PDF, SRT, and VTT.
- Use TXT when you need plain text
- Use DOCX when you want a Word document
- Use PDF when you want to share a polished transcript
- Use SRT or VTT when you need subtitles or captions
This is one of the strongest reasons to use HappyScribe instead of relying only on Zoom’s native transcript file. You can choose the output based on the job you need the transcript to do.
📌 Want to capture live Zoom meetings instead of pre-recorded audio? Check out our guide on how to take notes during Zoom meetings.
Do more with your Zoom transcripts in HappyScribe
A transcript is useful on its own. HappyScribe also gives you ways to search, analyze, and connect recorded meeting content after transcription.
Use AI Chat to ask questions about transcripts
HappyScribe’s AI Chat lets you ask questions about your transcripts instead of opening each file manually. It can extract quotes, compare what different participants said, identify patterns, and find action items across transcript files.
For example, you can ask:
- What did the client say about pricing?
- Pull quotes about onboarding from these customer interviews.
- What objections came up in our last sales calls?
- Which action items came from last week’s project meetings?
This turns recorded Zoom calls into a searchable knowledge base.
Use MCP and API for advanced workflows
For teams with more technical workflows, HappyScribe also offers MCP and API access.
The MCP Server connects your transcription library to MCP-compatible AI tools like ChatGPT, Claude, Copilot, Gemini, and Perplexity. The API lets developers create transcriptions from URLs or file uploads, export in 15+ formats, manage folders, and receive webhooks when processing is complete.
It is mainly useful for enterprise, research, media, and product teams that process Zoom recordings at scale.
Zoom’s native transcription vs HappyScribe
| Need | Best option |
|---|---|
| You recorded to Zoom cloud and only need a basic VTT transcript | Zoom |
| You have a local Zoom recording saved on your computer | HappyScribe |
| You need a clean DOCX, PDF, or TXT transcript | HappyScribe |
| You need subtitles from the same Zoom recording | HappyScribe |
| You need transcription in 150+ languages | HappyScribe |
| You want AI or human transcription options | HappyScribe |
| You want AI Chat for transcript analysis | HappyScribe |
| You want MCP or API access for advanced workflows | HappyScribe |
So, what’s the best way to transcribe Zoom recordings?
Zoom’s native transcript feature is useful when your recording is already saved to the cloud and audio transcription is enabled. It gives you a VTT file that works well for basic review and caption-style playback.
But many recorded Zoom calls need more than a basic transcript file. You may need a clean Word document, a shareable PDF, subtitles, speaker labels, translation, or a searchable transcript library.
HappyScribe gives you a more flexible way to transcribe recorded Zoom calls. You also get 150+ language support, AI Chat for transcript analysis, and MCP and API access for advanced workflows.
Try HappyScribe for free the next time you need to turn a Zoom recording into accurate and searchable text.
FAQs on how to transcribe Zoom recordings to text
Can Zoom transcribe recordings to text?
Yes. Zoom can transcribe cloud recordings when audio transcription is enabled. The transcript appears as a VTT file after processing, and you can view or edit it in the Zoom web portal.
Can Zoom transcribe local recordings?
Zoom’s audio transcription workflow applies to cloud recordings. If your Zoom recording is saved locally on your computer, upload the file to HappyScribe to transcribe it.
What format does Zoom use for transcripts?
Zoom saves audio transcripts as VTT files. You can open a downloaded VTT file with a text editor or word processor, but it may need cleanup before it works as a polished document.
Can I convert a Zoom recording to a Word document?
Yes. Upload the Zoom recording to HappyScribe, generate the transcript, edit it, and export it as a DOCX file. You can also export as TXT, PDF, SRT, or VTT.
Can I transcribe Zoom recordings in different languages?
Zoom supports 19 languages for cloud recording transcripts and lets you change the transcript language and re-process the file. HappyScribe supports video transcription in more than 150 languages and accents, which makes it useful for multilingual Zoom recordings, international interviews, global webinars, and multilingual customer calls.
Can I ask questions about my Zoom transcripts?
Yes. HappyScribe’s AI Chat lets you ask questions about your transcripts, pull quotes, compare responses, find themes, and identify action items.

Rodoshi Das
Rodoshi is the Content Lead at HappyScribe, the privacy-first transcription and AI notetaker platform based in Barcelona. Shaping content strategies and building AI workflows excites her as much as exploring new SaaS tools. She specializes in product-led content that informs rather than sells, grounded in honest product benchmarking and low tolerance for empty marketing speak.